Stalls, Spins, Inertia and You
Or: “There’s more than one way to spin a cat”
On the slope and at the airport there is often discussion over what constitutes a ‘snap roll’ and the technique to get an airplane or glider to enter one. There are two common ways of snapping, both using in-spin rudder and up elevator (consider an upright, or inside, snap for now). The difference is in the direction of applied aileron, whether it’s in-spin or out-spin (i.e. cross-controlled). It’s not unusual to hear debate over which one is ““better”, so let’s look at the effects of each. (note: the real answer is “use the one that works the best for your airplane.”)
One traditional definition of a snap roll is a ‘horizontal spin.’ A spin is really a stall with asymmetric drag that causes self-sustaining rotation, AKA an ‘autorotative’ stall. Note that this may require pro-spin controls, but the rotation generally keeps going until you remove the controls. On the other hand, if you get high roll rate and high pitch rate together you can pitch and roll the airplane into what looks like a high-energy snap or flat spin but the method is really a coupled departure in pitch caused by roll, not an initially autorotative stall. It usually looks great, and the distinction really isn’t important to anyone except nit-pickers and people trying to show why one control setup is better than another for snaps [Editor’s Note: I guess that puts me in the latter category and Nauga in the former 😉 ]
A little background: A ‘conventional’ spin/snap is entered by stalling one or both wings with roll rate and sideslip, and the resulting drag (due to control deflections, roll/yaw rates, and sideslip) causes autorotation. It’s the stall, not the other factors, that is the primary cause of the maneuver. In an inertia-coupled departure the roll rate is the primary cause, and the stall is secondary.
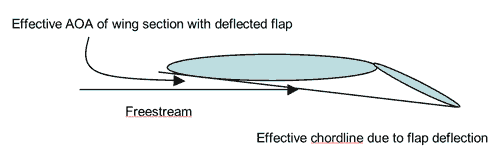
There are a couple of concepts to consider first. Deflecting ailerons changes effective AOA of a wing, roll rate changes effective AOA, and roll rate + AOA = pitchup. We’ll neglect sideslip for now because aerobatic airplanes don’t usually have much dihedral or the effect of same. So look at a wing section under two conditions, Roll rate and aileron deflection:
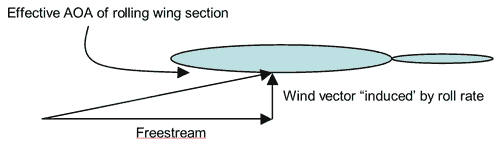
This is known as “Roll Damping.”
Some folks suggest that roll damping increases the severity of a rolling stall and makes snaps ‘snappier’, but in general the AOA change due to surface deflection is greater than the AOA change due to roll rate at the rates and deflections we’re talking about. Crunching some PIDOOMA (‘pulled it directly out of my…’) numbers representative of aerobatic slopers show that it takes about 2-5x the roll rate (in deg/sec) to induce the same AOA that aileron deflection (in deg) induces. So all this is a long way of saying you typically (but not always) get more AOA change (positive or negative) from aileron deflections than from roll rates – which gives us an idea of which wing is at higher AOA at entry and during the maneuver.
So that’s the wing, now move on to a fuselage at some angle of attack and under roll rate:
When the airplane is at an angle of attack with respect to the longitudinal axis and rolls about the longitudinal axis, inertia coupling results in a nose-up pitching moment. The higher the mass concentrations away from the CG the stronger this tendency.

This is called ““Inertia Coupling”, or the ‘dumbbell effect.’ (it’s really more involved than this but you get the idea).
So for the inertia-coupled maneuver, enter at high speed with full aft stick and coordinated rudder and aileron (left rudder/left stick in the example). While pre-stall the ailerons are going to give you roll rate and acceleration, which causes pitch-up through inertia coupling. With high enough roll rate and considering that you’ve already got nose-up pitch stick as well, post-stall AOA is only a heartbeat away. All that roll rate suddenly couples into yaw rate and the airplane can basically ‘flat plate’ itself in pitch while yawing. Even after the wings stall if the ailerons are effective they’re generating left roll, still nose-up and ‘spin’ sustaining. The rudder helps by adding yaw rate that makes it look a little faster and can sustain the yaw in a traditional spin after the initial energy bleeds off.
A ‘textbook’ snap, on the other hand, can be entered just like a spin, but at higher speed: full aft stick and cross-control (left rudder/right stick in the example). Rudder gives initial yaw rate, both wings stall, with or without significant roll rate. The left wing is at higher AOA due to aileron deflection so provides less lift and more drag (remember, we’re post-stall), and more pro-spin yawing moment (because of the drag). The left wing has less lift, so airplane rolls left, further increasing AOA, further increasing drag and decreasing lift. Voila, auto-rotation.
In a fully-developed stall or ‘textbook’ snap in-spin stick will slow the rates and out-spin stick will increase them – due to the increase in drag on the downgoing wing. This doesn’t usually look as cool as an inertia-coupled departure, but it’s more a ‘true snap’, which is meaningless to anyone but judges and instructors. This is by no means absolute, by the way – if you ailerons are effective post-stall in-spin aileron may be more effective in sustaining it, for example. You might also find that the inertial departure makes for a snappier entry but if you’re sustaining the spin applying cross control helps after the initial excitement has died down.
I have a Patton Me-262 that will do an awesome inertial departure that looks like a snap, but with no rudder it won’t spin conventionally. With a nice aft CG and a fair amount of speed, hit it right and it will auto-rotate for 5-6 turns if it doesn’t hit something else first.
Written by Dave “Nauga” Hyde
2 thoughts on “Stalls, Spins, Inertia and You”
Leave a Reply
You must be logged in to post a comment.

If you unload after reaching critical AOA and applying full rudder, the roll rate will be much higher than if you simply maintain aft stick and “bury” the snap. The snap really hooks up and is much more axial when you unload with forward stick. Also if your ailerons are relatively big, pro rotation ailerons will increase the roll rate as well. When done well, the snap looks like an extremely quick pitch up (or down) to the critical AOA (probably not more than 20 degrees), followed by an axial roll that is nearly identical to an aileron roll. Unloading is the key to making the snap very crisp and elegant.
Michael:
I agree with your comments- this is exactly what I found in flying the (full scale) Yak 55M.
Nikolai Timofeev teaches this method: back stick to increase the AOA (to just less than stalling), applying full right rudder, followed immediately and as rapidly as possible to full forward elevator, with aileron in the direction of the roll; maintain full right rudder until recovery. Then full left rudder, holding the stick forward and centered. Reset controls immediately after exit to maintain the line.
The main difference between this and other published techniques is that there is no waiting for the rotation to start before applying the forward stick to ‘unload’ and accelerate the rotation.
The stick is initially brought aft and a little to the left in the loading phase as the rudder is applied. This prevents the roll from starting until the rapid forward stick movement is made, which is required by the judging criteria. The airplane will pitch upward with no roll, but yawing to the right. The rapid forward stick movement locates the mass distribution closer to the axis of rotation, which increases the roll rate (conservation of angular momentum). The aileron deflection (I think) assists in the roll, over parts of the wing that are not stalled, and may reduce drag by aligning closer to the local airflow over sections of the span – the aileron is almost full span and forms a large part of the wing.
Nikolai uses the terms ‘chin’ and ‘chau’ (or ‘chow’, I haven’t seen it written) to denote these stages. The ‘chin’ is the initial loading phase, ‘chau’ is the rapid forward stick movement: chin, chau.
As I flew, Nik could isolate a problem to the chin or the chau phase.
I did encounter an uncomfortable negative tumble when I (by mistake) did not hold full right rudder. If the ‘chin’ is insufficient, the result of the ‘chau’ can be a nasty lurch, and the start of a tight inverted barrel roll (if the stick is held in position).
I found that it took me a lot of practice to get this to work reliably for me, but when it worked, my rolls were faster than before, about 1+1/2 in the time it took for one previously.